Guidelines for Installing DaVinci Hand-Split Shake Siding
by Eric Salvesen, Technical Services Manager

Earlier this year DaVinci Roofscapes introduced a new product line — our DaVinci Hand-Split Shake Siding.
I’ve been on a few job sites where the product was being installed. From seeing the start of those projects, it’s clear that some installation tips could come in handy when you tackle our siding products.
First of all, a full installation guide is online for the DaVinci siding products. I encourage you to read through this entirely before starting your first siding project with our tiles. Complete with illustrations, this guide offers key insights into:
- Clearances
- Blocked Penetrations
- Cutting Fastening
- Starter Tile Course Installation
- Layout and Staging
- Shake First Course Installation
- Reveal/Overlap
- Installing Subsequent Shake Courses
- Treatments for Window/Door Openings
- Trim Attachments
- J Channel
- Terminations
Job Site Insights
With all that information, what more could you need? The answer is: some actual job site feedback.
When I arrived at one home project, the first two courses had already been installed. We had to remove them. Why? Five reasons:
- the siding product was installed with no spacing
- siding nails were used
- corner trim and windows were not “packed out”
- no window flashing tape had been used
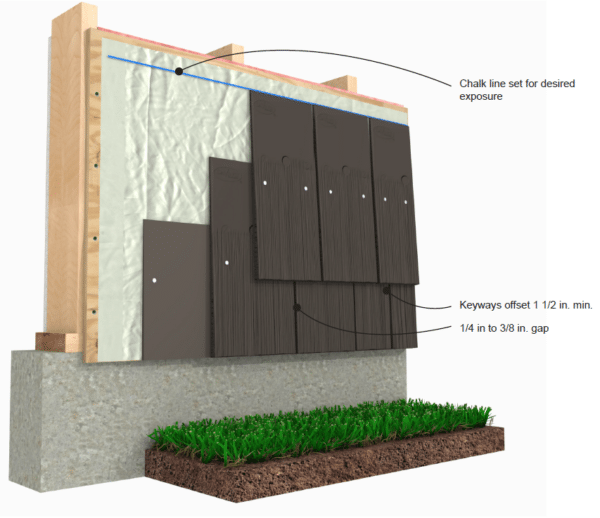
- red chalk had been used
Let’s address each issue.
Issue #1 – Spacing. DaVinci siding shakes should be spaced no closer than ¼” and no greater than 3/8”. You’ll want to stage and layout the pattern in advance of installation. There are four styles of shake available in each bundle, so each course should be laid out in advance before proceeding up the wall. This helps you avoid creating patterns and stacked keyways. (See Section 9 of the guide)
Issue #2 – Fastening. Our DaVinci Hand-Split Shake Siding must be installed with a full round head, roofing nail with a minimum length of 1-3/4”. Fasteners must be corrosion resistant. Either hot dipped galvanized, electro galvanized, or stainless-steel fasteners are all acceptable. And, please check with local code requirements — especially in coastal areas. (See Section 8 of the guide)
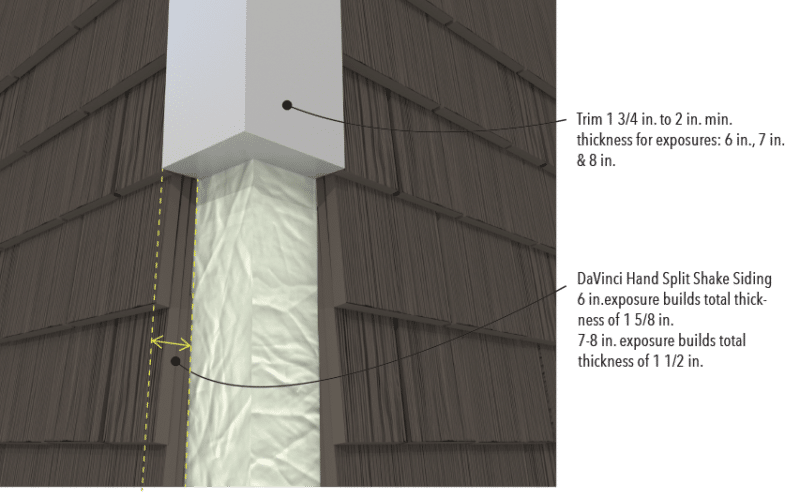
Issue #3 – Packing Out. All shake siding install actions must incorporate the use of corner boards. There are details in Section 10 of the installation guide. Several trim options are spelled out in the installation guide, but the key is that to meet the required thickness, a continuous, solid shim build out or “pack out” behind the trim may be necessary.
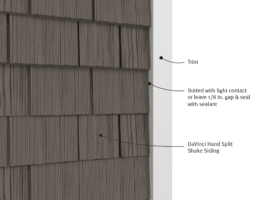

Issue #4 – Flashing Tape. All horizontal trim must be properly flashed around door/window/vent type openings. Generally flashing must be present at all horizontal trim with a 1/16” to 1/8” gap present between the shake bottom edge and the flashing. Do not caulk this gap or use raw aluminum flashing. The flashing you use must be galvanized, anodized or PVC coated. Window manufacturer’s requirements should be observed. (See Sections 9 and 10 of the guide)
Issue #5 – Chalking. Just as with DaVinci roofing products, red or black chalking should never be used. These colors can leave permanent marks on the siding product which the homeowner will see in a staggered application. A better method to use is to snap lines on the underlayment and to use blue chalking. (See our blog)